Resources Used In This Tutorial
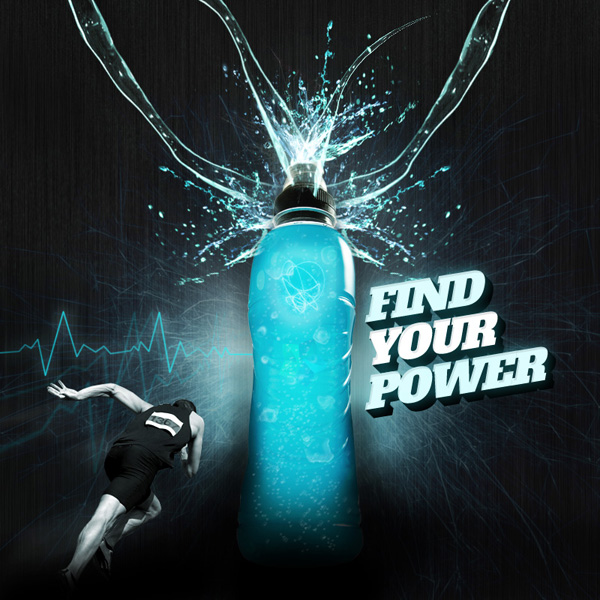
Final Image
Here is a preview of the image that we are going to be creating:
Step 1
Create a new document (800X800px and 300px/inch resolution).Create a new document called ‘background’ and fill your entire canvas with black:

Wit
h this ‘background’ layer selected, go to filter>convert for smart filters. This will allow you to apply filters in a non-destructive way.
Now go to filter>noise>add noise. Apply the settings shown below:
Noise Filter Settings:
Amount: 20%
Distribution: Gaussian
Monochromatic: (check box)

Now go to filter>blur>motion blur. Apply the following settings:
Motion Blur Settings:
Angle: 90 degrees
Distance: 100 pixels
You may notice that this causes a strange effect at the top and bottom of your canvas. To fix this, simply transform your black area, making it taller, pushing the edges above the top/bottom of your canvas.

Step 2
Create a new layer called ‘highlight center’.Use a large, soft white paintbrush to paint in a shape like the image below:

Reduce this layer’s opacity to 20%:

Now create a new layer called ‘highlight blue’.
Use a large, soft blue (02c3d9) paintbrush to paint a shape in like the image below:

Change this layer’s blend mode to ‘overlay’ and reduce it’s opacity to 40%:

Step 3
Paste in the ‘sparkler’ image from the resources section for this tutorial. Position it roughly in the center of your canvas:
Now change this layer’s blend mode to screen (this hides the black background), and reduce it’s opacity to 20%:

Apply a hue/saturation and then a color balance adjustment layer to this sparkler layer. Be sure to give each adjustment layer a clipping mask, so that your adjustments only effect the underlying sparkler layer.
Hue/Saturation Adjustment Layer Settings:
Hue: 0
Saturation: -100
Lightness: 0
Color Balance Adjustment Layer Settings:
Highlights: -26 / 0 / +36
Midtones: -66 / 0 / +32
Shadows: -35 / 0 / +13

This is the result:

Step 4
Create a new layer called ‘heart rate’. You can use either your line tool, or your pen tool to create a heart rate graph shape. I used a 3px thickness line, color: 0bb3c4.
Apply a layer mask to this heart rate layer and then use a soft, 25% opacity black paintbrush to mask off certain areas of the line, making it more random, with varying opacities along the length of the line:

Apply an outer glow blending option to your heart rate layer.
Outer Glow Settings:
Blend Mode: Screen
Opacity: 50%
Noise: 0%
Color: c0f1fc

Here is the result:

Step 5
Duplicate your heart rate layer. Then go to edit>transform>distort.Distort your heart rate shape to look like the image below:

Reduce this layer’s opacity to 20%. Then duplicate it and distort the duplicate to overlap the other two lines:

Step 6
Open up the bottle image from the resources section for this tutorial.Extract it from it’s background and paste it into the center of your canvas:

Apply a hue/saturation adjustment layer to your bottle layer, being sure to apply a clipping mask:
Hue/Saturation Adjustment Layer Settings:
Hue: -5
Saturation: 0
Lightness: 0

Step 7
Create a new layer called ‘bottle shadow’ beneath your bottle layer.Use a soft black paintbrush to paint in shadows around the edges of your bottle.

Reduce this layer’s opacity to 20%:

Add a new layer called ‘reflective shadow’. Duplicate your bottle layer and move the duplicate beneath the original.
Go to edit>transform>flip vertical.
Move the flipped bottle shape beneath the original, to act as a shadow. Apply a black color overlay, making this shape solid black.
Then go to filter>blur>gaussian blur.
Gaussian Blur Filter Settings:
Radius: 5.0 pixels

Step 8
Create a new layer called ‘raylight’. This layer should still be beneath your bottle layer.Download the FanExtra raylight brush set found in the resources section for this tutorial.
Apply several of the brushes using a white brush. Create beams of light shooting up from the base of the bottle:

Change this layer’s blend mode to ‘overlay’:

Duplicate your ‘raylight’ layer. Change this layer’s blend mode to ‘normal’ and reduce it’s opacity to 20%:

Step 9
Create a new top layer called ‘shadows’.Use a large, soft, black paintbrush to paint over the bottom of your bottle and bottom of your canvas:

Step 10
Create a new layer called ‘bubbles’.Download the FanExtra bubbles brush set from the resources for this tutorial and use a white brush to apply bubbles over the bottle.

Go to filter>sharpen>sharpen. This helps bring out the detail of the bubbles:

Step 11
Download another one of the sparkler images from the resources section for this tutorial. Paste and position the sparkler over the bottle cap.
Change this layer’s blend mode to ‘screen’ to hide the black background and reduce it’s opacity to 30%:

Step 12
Paste in the third sparkler image, positioning it over the center of your bottle:
Change this layer’s blend mode to ‘screen’ and reduce it’s opacity to 70%:

Apply a hue/saturation and color balance adjustment layer (giving each a clipping mask).
Hue/Saturation Adjustment Layer Settings:
Hue: 0
Saturation: -100
Lightness: 0
Color Balance Adjustment Layer Settings:
Highlight: -46 / 0 / +35
Midtones: -60 / 0 / +53
Shadows: -26 / 0 / +12

Apply an outer glow blending option to your sparkler layer:
Outer Glow Settings:
Blend Mode: Screen
Opacity: 75%
Noise: 0%
Color: ffffff
Technique: Softer
Spread: 0%
Size: 21px


Step 13
Paste in your logo, positioning it over the center of your bottle:
Change it’s blend mode to ‘overlay’ and reduce it’s opacity to 60%:

Step 14
Download the image of the sprinter from the resources section for this tutorial.Extract him from his background and position him in the bottom left of your canvas:

Duplicate your sprinter layer and move the duplicate beneath the original.
Go to filter>convert for smart filters.
Go to filter>blur>motion blur. Apply the following settings:
Motion Blur Settings:
Angle: 21 degrees
Distance: 250 pixels
You’ll notice that your blur goes out at both sides of your sprinter. Apply a mask and mask off the area of blur that goes in front of the sprinter, leaving only a blur behind him.

Apply a hue/saturation and levels adjustment layer to your top sprinter layer (using a clipping mask for each):
Hue/Saturatoin Adjustment Layer Settings:
Hue: 0
Saturation: -100
Lightness: 0
Levels Adjustment Layer Settings:
20 / 0.91 / 221


Apply a new layer called ‘shadow sprinter’.
Use a soft black paintbrush to paint shadows over the bottom of the canvas and sprinter:

Step 15
Paste in the ‘stream of water’ image:
Change this layer’s blend mode to ‘screen’ to hide the black background:

Duplicate this layer three times to make it more obvious. Then merge these three layers into a single layer:

Step 16
Go to edit>transform>warp and warp your water stream into an arc stemming from your bottle cap.Repeat this step, applying another arc of water pointing the other way:

Add a couple more streams of warped water:

Step 17
Paste in the water splash image from the resources section for this tutorial, positioning it over your bottle cap:
Change this layer’s blend mode to ‘screen’ to hide the black background:

Add a couple more splashes to the sides of your bottle head:

Step 18
Create a new layer called ‘water droplets’.Download the water droplets brush set from the resources section for this tutorial.
Apply them using a white paintbrush. You will need to click each brush multiple times to make it bold enough to be visible.

Step 19
Type out some text to the right of your bottle.Text Settings:
Font Face: Alfa Slab One
Size: 14pt
Kerning: -50
Color: ffffff
Styling: Italics
Also, go to edit>transform>skew. Skew the text so it’s at a slight angle:

Apply an inner shadow and outer glow blending option to your text layer.
Inner Shadow Blending Option Settings:
Blend Mode: Multiply
Color: 000000
Opacity: 10%
Angle: 120
Distance: 3px
Choke: 0%
Size: 0px
Outer Glow Blending Option Settings:
Blend Mode: Screen
Opacity: 25%
Noise: 0%
Color: 35eeff
Spread: 0%
Size: 21px

Here is the result:

Step 20
Duplicate the text layer, moving the duplicate beneath the original.For this text layer remove all layer styles and then change the text color to black. Move this text layer down 1px and right 1px. You’ll see that this creates a subtle drop shadow effect:

Duplicate this black text layer and move it 1px down and 1px to the right. Repeat this step many times, until you have a substantial drop shadow area:

Step 21
Create a new layer called ‘white highlight’.Use a large, soft white paintbrush to paint over the bottle top and the middle of the bottle:

Reduce this layer’s blend mode to 15% and change it’s blend mode to ‘overlay’:

Create a new layer called ‘blue highlights’. Apply several soft blue brush marks over your canvas:

Change this layer’s blend mode to ‘overlay’ and reduce it’s opacity to 15%

Step 22
Create a new layer called ‘dodge/burn’.Go to edit>fill and fill your canvas with 50% gray. Change your layer’s blend mode to ‘overlay’ to hide the gray fill.
Then use a soft, 10% opacity black paintbrush to burn your image. Use a 10% opacity, white paintbrush to dodge your image.
Accentuate key areas of shadow and highlight.
Below you can see your dodge/burn image at ‘normal’ blend mode and then ‘overlay’ blend mode:


Step 23
Apply a final gradient map adjustment layer. Do NOT apply a clipping mask to this layer as you want your adjustments to effect your entire canvas, not just the underlying layer.Gradient Map Adjustment Layer Settings:
Gradient: Black to White
Opacity: 10%

And We’re Done!
You can view the final outcome below. I hope that you enjoyed this tutorial and would love to hear your feedback on the techniques and outcome.


0 Comments:
Post a Comment